The Grades:
The first thing you need to know about grades is they're just than a guideline based on other people's abilities and under perfect conditions.The grades are awarded by consensus and in relation to similar scrambles, but can still vary over time as routes become popular and holds become more worn. Under perfect conditions grades are:
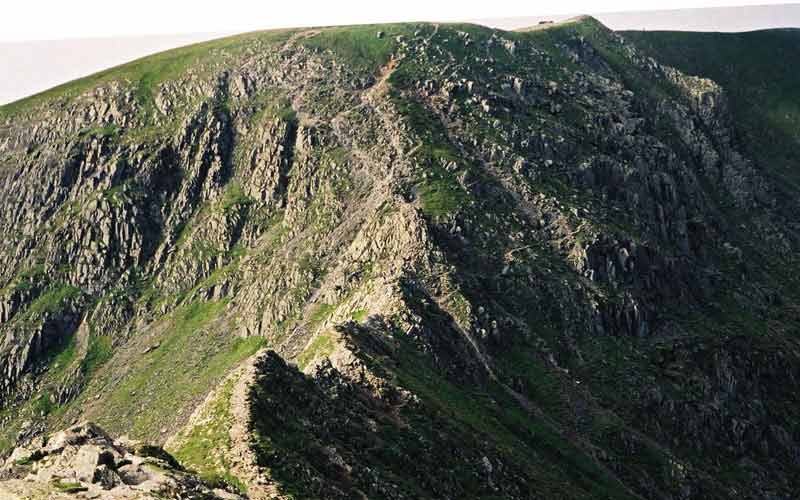
Striding Edge - a Grade 1 Classic
Grade 1
This is the easiest grade, where no specialist mountaineering skills are needed. Grade 1 routes should be within the abilities of most hill walkers without the need of a rope, although you should have a reasonable head for heights as Grade 1 routes often take exposed ridges. Route finding should be straight forward with good alternatives where difficulties may be encountered and you should be able to descend a Grade 1 route without needing a rope.
Grade 2
The next step up, and starting to use your hands for more than balance. Route finding may require a little more attention and the drops
a bit bigger, but Grade 2 routes should still be technically easy. Ropes can be helpful for confidence as exposure to heights is more important than on lower grade routes.
Grade 3
Route finding and exposure take a step up as you move onto Grade 3 routes. These routes will often be on the same walls, faces and buttresses as graded rock climbs so route finding becomes ever more important. Although the route as a whole may not class as a rock climb there will be individual sections or moves of Moderate or Difficult level, where the ability to use a rope and protection is advisable.
Beyond Grade 3 there are Grade 3S and even a Grade 4 in places as the boundaries with rock climbing become blurred - particularly on longer routes with isolated technical difficulties, but these extra grades aren't universally accepted and are partially down to regional differences. They are useful, however, to differentiate the few scrambles that push the upper limits of the traditional Grade 3. It's also important to note that regional differences do appear with Scottish grades being generally of a harder standard than those South of the border.
The first time you have to put your hand down on the rock for balance or to pull up a high step you've entered the world of scrambling. Most people don't even realise they've been scrambling, after completing classic routes like the Lake District's Striding Edge as the progression from walking seems so natural and unremarkable. The first steps are all about adjusting to exposure really, with the odd use of hands but nothing you would think twice about if you were 50cm off the floor. At this level there's no need for any extra equipment, and although routes may take a little more planning the rewards are more than worth it. Remember that scrambles are graded for ascent in good, dry, conditions when starting out and that any wind or rain can substantially affect the grade.
With scrambling growing in popularity a good place to start is with a guide book. There's a wide range available from dedicated publishers like Cicerone with guides for all the major scrambling areas organised by region. Guides covering Snowdonia and The Lake District are particularly useful when starting out as they cover long standing, tried and tested routes with maps, photographs and route finding tips to assist navigation. Guide books can also give you background information on the nature of the rock, when conditions are likely to be best and other useful local information as you prepare for your first trips.
Next Steps:
 From Grade 1 scrambles onwards it's time to start learning some specialist skills and start looking at dedicated scrambling specific equipment - but don't worry the skills are fairly simple to learn and initial equipment is minimal. As you move up to Grade 2 routes you need to start thinking about protecting yourself and others from an accidental slip or fall. Most Grade 2 routes won't need any knowledge of rope skills but it's a good time to learn some essential basics just in case the weather or conditions change. One option to consider is hiring an instructor for a day - learning how to handle ropes and use them for protection. The two main Mountain centres at Plas Y Brenin, in Snowdonia, and Glenmore Lodge in Scotland offer scrambling instruction with qualified experts who can both give you the essential skills and build the confidence required to use the skills. If you want something more informal you can book independent instructors, who can be hired on an individual or group basis - just check for professional qualifications and membership of the industry's body the Association of Mountaineering Instructors.
Equipment:
Starting out all you need are your basic hill essentials to keep you warm and dry, a head for heights and aroute guide and you've got everything you need for scrambling. General hill walking equipment works perfectly well for most scrambling, just pick something durable to resist the odd scratch and scrape and pay attention to your footwear. Once you take the step up to Grade 2 there's a whole range of kit designed for scrambling from boots to technical climbing hardware. As with lower graded scrambling the important areas are durability and footwear, but you'll also need some more technical hardware.
Helmets
are essential when scrambling at Grade 2 and above – not just to protect from falls but scrambles are often in popular walking and rock climbing areas where with the danger of falling rocks dislodged by people above. A good quality helmet will set you back around £40.
 As you progress through Grade 2 and Grade 3 routes you're going to need to be attached to a rope from time to time so an essential item is the climber's sit harness. With a helmet and harness in place you've got the main essentials for joining a mid to high end scrambling route, but only if someone has both a rope and the skills to use it. By the time you invest your own personal rope you should be familiar with different lengths, diameters and coatings but as a guide you'll need a "full" as opposed to "half" rope and preferably one with a "dry" coating which restricts water getting into the rope and increases durability.
Along with a rope you'll need some way of attaching it to the rock to provide protection, this can range from tape slings to climbing "Rocks" or similar - but you don't need the full range carried by most climbers. Fortunately the technical difficulties involved in scrambling are limited, and for the vast majority of routes all you'll need is a good selection of slings which can be wrapped around a rock to provide a running belay, and a choice selection of mid to large sized "Nuts" or "Rocks". A belay device is essential to provide friction and braking on the rope to protect every member of the scrambling group. The DMM Bug and Black Diamond ATC are both popular belay devices perfectly suited to scrambling and available from most outdoor shops at a reasonable price..
As with any trip into mountain areas you'll need the usual outdoor kit of suitable boots/footwear, wet weather gear, and a suitable rucksack to carry it all in. For low grade scrambling your normal hill footwear will be fine, but once you start stepping up the grades you may be persuaded
into something with stiffened sole and edges for better stability and friction. On higher graded routes there are two main options; specialist rock boots used by climbers, which give superb friction and edging, or Mountain Boots which give good stability and edging whilst being ideal for both winter and alpine excursions as well as scrambling. Boots like the Berghaus Kibo GTX and Scarpa Charmoz are ideal multi-purpose boots lightweight enough for scrambling but substantial enough for mountaineering. As with any outdoor gear it's important to choose something that suits you individually in terms of fit and comfort, as well as being up to the extra abuse scrambling will inevitable include.
Note: This article was restored from the archives. It's published creation date is inaccurate.